10 Aug Why Should You Keep Your Trimming Machine Clean?

Why Should You Keep Your Trimming Machine Clean? |

Why Should You Keep Your Trimming Machine Clean? |
Trimming machines don’t require lunch breaks but they do require regular cleaning to keep running smoothly. Keeping your bud trimmer machine clean is crucial for several reasons:
Preventing Clogs and Jams
No matter if you trim your plants wet or dry, after a few hours or a day of running, there will be a sticky residue left on the material contact surfaces of the bud trimming machine. As the residue accumulates on blades, tumblers and other components, there is a higher risk of clogs and jams occurring. This buildup can interrupt the trimming process and require time-consuming troubleshooting and maintenance. By cleaning the machine regularly, you minimize the risk of clogs and jams, and ensure the trimmer machine continuously run smoothly during the harvest process.
When your machine is free from the clogs and jams caused by residue, it operates efficiently and keeps the throughput and quality trim which it is designed for. The efficiency and productivity are important for growers especially for the commercial operations.
Preventing Contamination
Regular cleaning your bud trimming machine maintains a hygienic environment. By removing the debris, it prevents the growth and spread of mold and bacteria, reducing the risk of contamination and ensuring a hygienic trimming process.
Maintaining Consistent Quality
When the machine is free from residue and debris, it trims the flowers more accurately and uniformly. It is important to maintain consistent quality in your product.
Extending Lifespan
A well-maintained bud trimming machine typically lasts longer. Cleaning and properly maintaining your machine help prevent excessive wear and tear. It reduces the likelihood of breakdowns and extends the machine lifespan.
Regular cleaning also gives you opportunities to identify and address any minor issues of your trimmer machine before they escalate into more significant problems. This way, you maximize its longevity and get the most out of your investment.
Make sure to follow the manufacturer’s guidelines for cleaning and maintenance of your trimming machine, and establish a regular cleaning routine to ensure optimal performance and longevity of your trimmers.
How to clean a Zoom Pro trimming machine?
Zoom Pro is easy to clean. The way we designed the machine makes it simple to disassemble and easy to access the material contact surfaces.
Tools we recommend to use:
- Rubber gloves
- Safety glasses/eyewear
- Plastic brushes
- Plastic scraper
- Pressure washer
- Cleaning solution: we recommend Greased Lightning Super Strength for DEEP CLEANING. When you apply this solution, make sure the area you’re cleaning has good ventilation.
How often shall you clean the Zoom Pro?
Wet trimming: when you notice the flowers aren’t getting a close trim or the trimming result is not consistent, it’s time to clean the trimmer machine.
Dry trimming: clean your Zoom Pro after a day of use.
Cleaning Process
Clean barrels
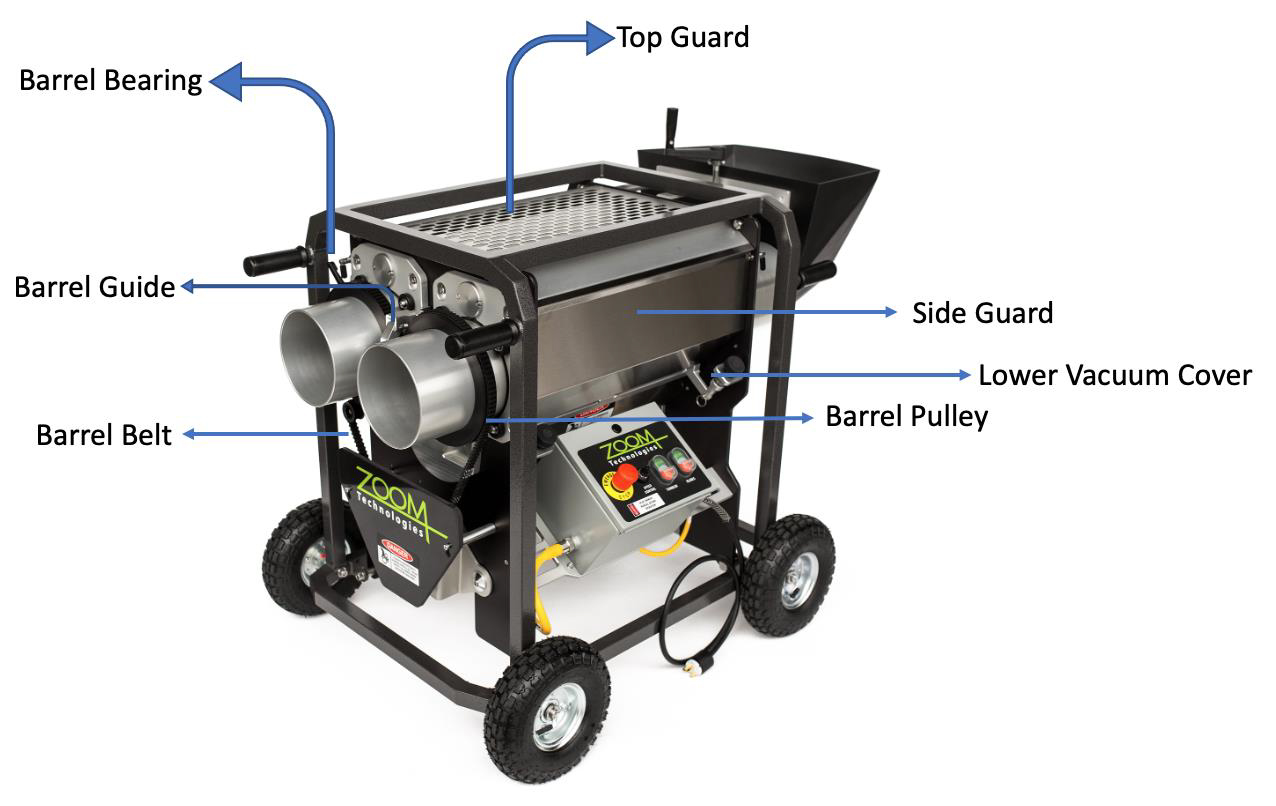
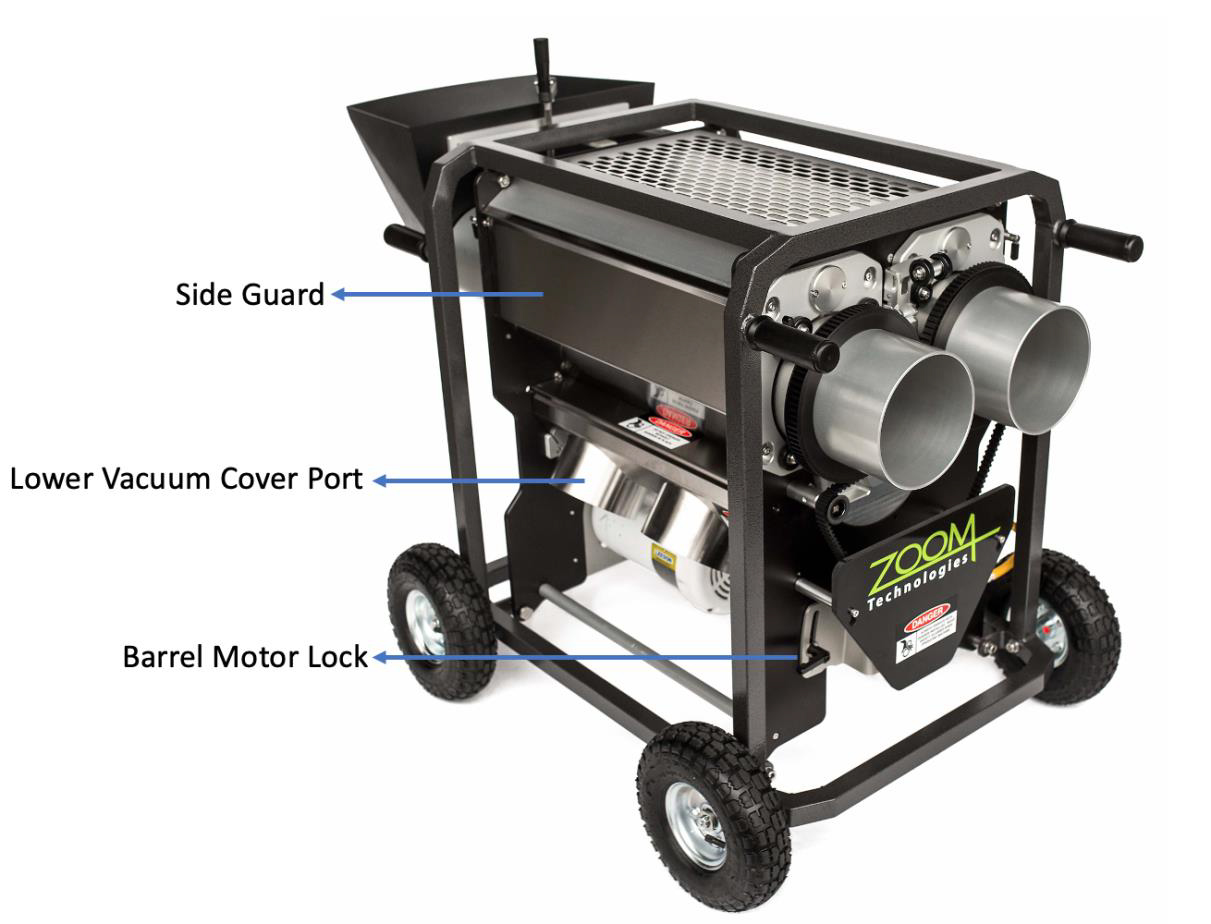
1. Unplug the Zoom Pro machine and remove the both stainless steel side guards.
2. Raise barrel bearing up and lock it in the place.
3. Raise barrel guide to unlock the barrels.
4. Unloosen the barrel motor lock and raise the barrel motor.
5. Remove the barrel belt around the barrel pulleys.
6. Now pull each barrel out carefully and lay them down on a stable and safe platform.
7. Cleaning – there are multiple ways to clean the barrels.
a. Brush off the residue and spray with a pressure washer. Or,
b. Soak the barrels to remove all the residue. Or,
c. Brush off the residue and deep clean with the Cleaning Solution.
Clean stationery blades – there are 2 stationery blades on each Zoom Pro trimmer machine
8. Pull stationery blade pins (on each side) out.
9. Swing blades up to access the underside.
10. Use a scraper to remove the residue/debris from the stationery blades.
Clean reel blades and the whole machine
11. Remove the lower vacuum cover.
12. Place a plastic bag over the barrel motor for protection.
13. Put the lower vacuum cover back to its place. This will help control the pressure washing spay. The vacuum cover ports will drain water through.
14. Pressure wash from top down. Start with barrel brushes and stationery blades.
15. Pressure wash the blade edge of the reel cutter. Rotate and repeat until each of the blade is cleaned.
16. Wipe the entire machine down including the barrels with clean cloth.
Assembly after cleaning
17. Install top vacuum cover. Make sure the pins are latched securely.
18. Install stationery blade pins. Swing both stationery blades back to their places.
19. Install the left barrel carefully. Lock left barrel bearing down.
20. Install right barrel carefully.
21. Install the barrel belt around the right barrel pulley.
22. Drop down barrel guide. Loop barrel belt around idler pulley.
23. Drop the barrel motor down and tighten it. Check for 1” of belt play.
24. Install both side guards and latch pins securely on both sides.
25. Install the top guard.


Watch this video to follow the steps of disassemble a Zoom Pro.
Cleaning tips –
1. Before starting the cleaning process, ensure you have all the required cleaning supplies available. Having everything on hand will minimize interruptions and allow for a more streamlined cleaning process.
2. If you have multiple people work in your cleaning team, have one person clean the barrels while another person focuses on the rest of the machine. This increases overall efficiency and reduces the machine downtime.
3. Keep a maintenance parts kit specifically for your trimming machine. This kit should include spare parts such as extra barrels, extra stationery blades, belts, and any other components that may require regular replacement or maintenance. This way, you can switch all the parts need to be cleaned with the maintenance parts to keep the machine running. At the same time, your cleaning team cleans the replaced parts.
How to clean a Zoom Pro Leaf Collector?
To clean the leaf collector, turn it off and unplug. Remove the Y connection duct with hoses and the filter bags. Remove the 8 screws around air intake plate for maximum access to the impeller for cleaning. Use a pressure washer or a plastic scraper to remove debris from the impeller, housing and related ducts. Be cautious to keep the blower motor and controls covered and dry if using a pressure washer. Once cleaned reattach the intake plate with the 8 screws. Turn the vacuum on without hoses to remove any remaining material before installing bags and hoses.

